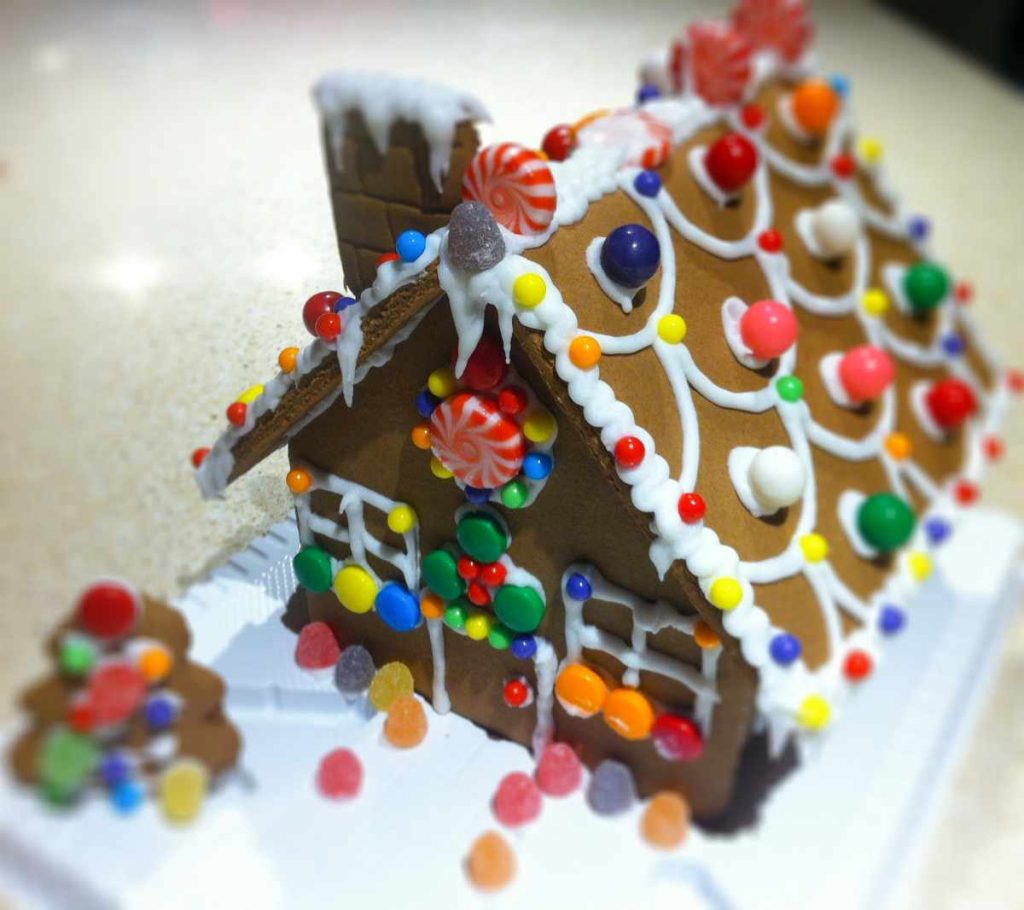
There’s something magical about gingerbread houses at Christmas.
Maybe it’s the cozy glow they bring to your table, or maybe it’s the nostalgia — that scent of cinnamon and sugar that makes you feel like a kid again.
But let’s be honest: baking, gluing, and balancing walls made of cookies can be… a little stressful.
That’s where cardboard gingerbread houses come in — the perfect, mess-free twist on a timeless holiday tradition.
They’re fun, family-friendly, and don’t crumble to pieces when you sneeze. Best of all, they last for years, becoming part of your holiday decor instead of your holiday cleanup.
With a few recycled boxes, some glue, and your imagination, you can turn an ordinary piece of cardboard into something truly festive — whether it’s a little tabletop cottage or a full-on playhouse your kids can crawl into.
Let’s walk through the story behind gingerbread houses, why cardboard is such a clever substitute, and how to build one step by step.
Why People Make Gingerbread Houses for Christmas?
Gingerbread houses are more than just cute crafts. They’re part of a centuries-old tradition that blends folklore, food, and festivity.
Historians trace their roots back to 16th-century Europe, especially Germany, where elaborate gingerbread cookies were popular during winter markets.
But the story really took off after the Brothers Grimm published Hansel and Gretel in 1812 — that spooky fairy tale about two children stumbling upon a witch’s cottage made of “gingerbread, cookies, cakes, and candy.”
The story enchanted people, and suddenly, building gingerbread cottages wasn’t just about baking — it was about creating a little bit of that fairy-tale magic at home.
Back then, gingerbread wasn’t an everyday treat. It was baked for special occasions — fairs, holidays, and religious celebrations. Families would spend hours crafting intricate houses together, decorating them with sugar icing and candies.
It was labor-intensive, yes, but it was also joyful — a perfect way to gather around the table, laugh, and make something beautiful during the cold winter months.
Over time, the tradition evolved into the Christmas custom we know today. Only now, instead of a one-time edible decoration, many of us are finding new ways — like cardboard versions — to keep that same spirit alive year after year.
Why Use Cardboard Instead of Gingerbread?
Sure, real gingerbread smells amazing. But once the icing hardens and the cookies start to stale, your masterpiece eventually meets the trash can. That’s the beauty of cardboard — it gives you all the fun, none of the waste.
Here’s why more people are swapping sugar for paper:
1. It lasts
Cardboard houses don’t crumble, get sticky, or attract ants. You can pack them away and bring them out again next Christmas — just like your ornaments or wreaths.
2. It’s mess-free
No baking trays. No sticky royal icing. No collapsing walls at the last second. You only need scissors, glue, and a bit of patience. Even toddlers can help without supervision near a hot oven.
3. It’s eco-friendly
We all have those leftover shipping boxes from online shopping. Instead of tossing them, you can give them a new life as cozy little gingerbread homes. It’s sustainable crafting at its best.
4. It’s flexible
Cardboard is sturdy yet easy to cut, meaning you can create anything from a simple flat ornament to an elaborate multi-room playhouse. The sky — or should we say, the roofline — is the limit.
How to Build a Gingerbread House Out of Cardboard?

Okay, let’s roll up our sleeves. You don’t need to be an artist or an architect to make one of these — just follow these steps and let your creativity take over.
Materials You’ll Need
Before you start, gather a few basic supplies. Most are things you probably already have lying around:
Base Materials:
- Cardboard boxes (Amazon boxes are perfect)
- Kraft paper or brown wrapping paper (optional — it gives that real “gingerbread” color)
- Scissors or an X-Acto knife with a metal ruler for neat cuts
Adhesives:
- White school glue or craft glue
- Hot glue gun with glue sticks
- Spray adhesive (optional, for paper covering)
Decorating Supplies:
- White paint or paint markers
- Shaving cream (for that fluffy frosting texture)
- White glitter
- Sequins, buttons, beads, pom poms, or any small embellishments
Tools:
- Bowl and spoon (for mixing frosting)
- Popsicle sticks or plastic knives (for spreading)
- Baggies (for piping frosting)
- Pencil and ruler (for templates)
- Tracing paper or wax paper
Optional Add-ons:
- Styrofoam sheets (for display stands)
- Fairy lights
- Cotton or fiberfill (for snow)
- Colored markers or Sharpies
Step 1: Design and Cut Your House Pieces
Start by sketching out your house on cardboard. A simple design includes two side walls, a front and back wall (each with a peaked roofline), and two roof panels.
If you’re going for a small tabletop house, try dimensions around 4 x 3 inches, but feel free to go bigger. Use a ruler for straight lines and cut carefully with an X-Acto knife — always away from your body.
Tip: if you’re crafting with kids, pre-cut the pieces for them to decorate safely.
Step 2: Assemble the Structure
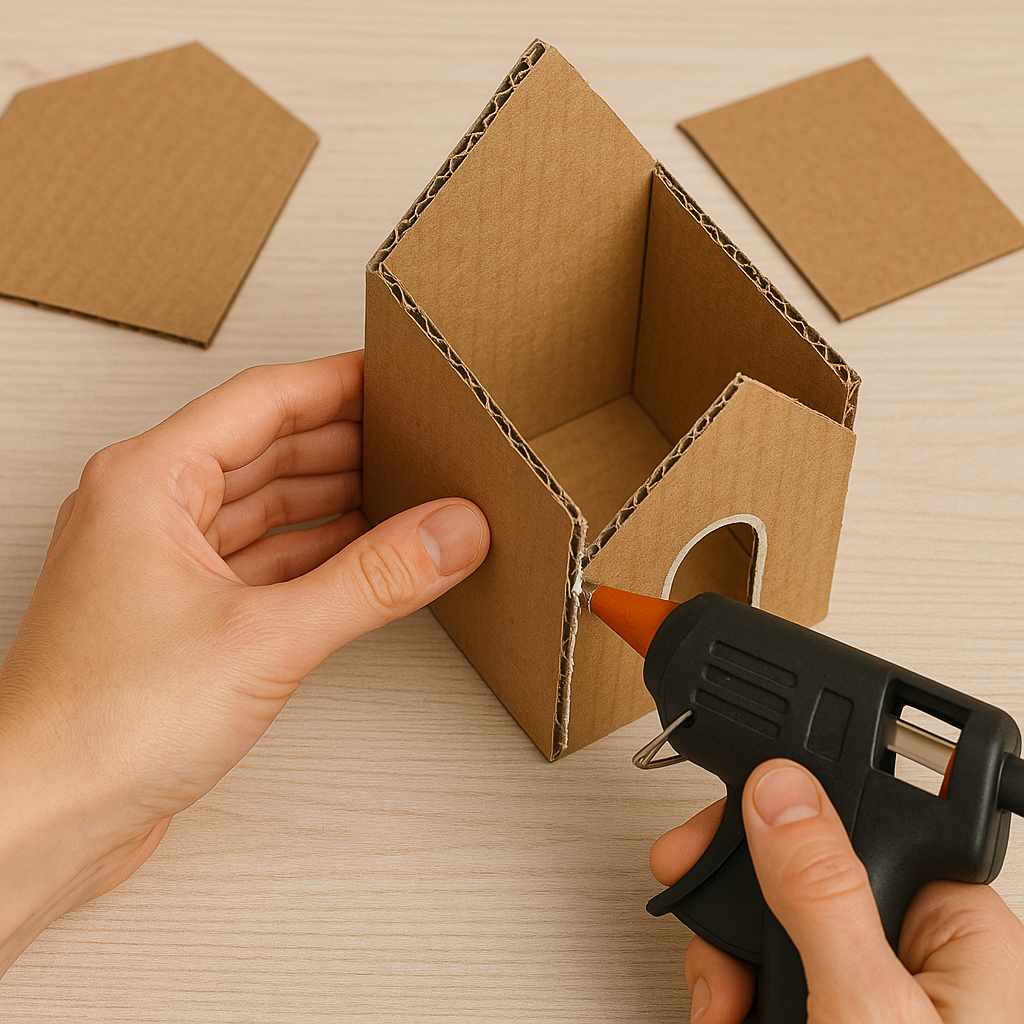
Now, glue time! Use hot glue or craft glue to attach the walls together. Hold each joint for a few seconds until it sets. Then add your roof panels, making sure they meet neatly at the top.
If you’re working on a bigger project or using thicker cardboard, let the glue dry overnight. This helps the structure stay solid while decorating.
For a simpler version, skip the 3D part altogether — just cut out a house silhouette from cardboard and decorate it flat. It’s great for hanging on walls or turning into tree ornaments.
Step 3: Cover with Kraft Paper (Optional)
Want your house to actually look like gingerbread? Wrap it in kraft or brown paper first. Spray a light coat of adhesive on the cardboard, then press the paper smoothly over it.
Smooth out wrinkles with your hands and trim any extra paper. You can even wrap the edges like a gift. No spray adhesive? Regular white glue works too — just use a thin coat to avoid bubbling.
Step 4: Add the “Icing” Outlines
This part is where your house comes alive. Grab a white paint marker or brush and start drawing icing lines along the edges, windows, and roof.
Add details like shingles, swirls, dots, and little hearts. Take your time — neat lines make all the difference. Imagine you’re piping frosting on a real cookie!
Step 5: Make the Shaving Cream Frosting
This trick is genius. Mix equal parts shaving cream and white glue in a bowl. The result? A fluffy, foamy mixture that looks just like real icing.
Spread it on the roof with a popsicle stick or spoon it into a plastic baggie and snip off a corner to pipe it on. It’ll dry with a soft, spongy texture that’s almost good enough to eat (but don’t!).
Step 6: Add Glue and Glitter
For that sugary sparkle, trace over your painted lines with craft glue, then sprinkle white glitter before it dries. Shake off the excess over a piece of paper so you can reuse it.
This gives your house that frosted, wintery look — especially when it catches the light.
Step 7: Decorate with “Candy”
Now comes the fun part — decorating! Press sequins, buttons, pom poms, or beads into the wet glue or frosting to mimic candy.
Think rows of gumdrops on the roof, peppermint buttons around the door, or tiny bead garlands under the eaves. There’s no wrong way to do it — just let your imagination run wild.
Want to go fancy? Add paper cutouts of trees, ribbon bows, or tiny fake greenery for a woodland touch.
Let everything dry completely before moving it — patience pays off here.
Step 8: Optional — Cut Out Windows and Doors
Once everything’s dry, you can carefully cut out windows or a door with your craft knife.
If you want to go the extra mile, tape colored tissue paper or cellophane behind the openings for a stained-glass effect. When you shine lights inside, it’ll glow beautifully.
Step 9: Build a Display Base
If you’ve made more than one house, why not turn them into a little gingerbread village?
Use Styrofoam sheets to create platforms of different heights. Glue the houses on top, wrap fairy lights around them, and scatter cotton for snow.
For single houses, cut small slits at the bottom and insert cardboard stands to help them stay upright.

These images are AI generated
A Few Final Tips
- Use recycled boxes for an eco-friendly project. Shipping boxes, cereal boxes, even shoe boxes work great.
- If you’re working with kids, skip sharp tools and use child-safe scissors or pre-cut shapes.
- Store your finished house in a dry box or tote to protect it for next year.
- Add battery fairy lights inside for a warm, cozy glow through the windows.
Why This Craft Is Worth Trying?
Building a cardboard gingerbread house isn’t just a holiday project — it’s an experience. It’s an afternoon spent laughing with your kids, sipping cocoa, and watching imagination come to life.
It’s a way to decorate without waste, to craft without chaos, and to create something that’ll make your home feel a little more magical every December.
So this year, skip the sticky icing and crumbling cookies. Pull out that stack of old boxes and build yourself a holiday memory that won’t melt away.

Khaja Moinuddin, a computer science graduate, finds joy in gardening and homesteading. Join him on this blog as he shares his experiences in homesteading, gardening, and composting